For Christmas I gave my mom a book called Fabric Leftovers, about little things to do with scraps of fabric. Not that she has any of those...
One of the ideas was making "sweet beads", little beads from tubes of fabric. So, I used the leftover interfacing with the hole from the previous post, expanded the hole a bit, filled it with a sweet bead, and called it an ATC:
The bead makes the ATC quite thick:
Saturday, December 31, 2011
Friday, December 30, 2011
Blue Ribbon ATC
So back in August 2005, right before I left the States for Hungary, my quilt group had it's annual picnic, including the showing of our challenge quilts. That year, the challenge involved using a certain fabric, as well as drawing at random a quote to interpret in your quilt. My quote was something about postage stamps, so of course I did a Postage Stamp / Trip Around the World quilt. See that one fourth from the left? See that lovely rainbow effect? Those are hundreds and hundreds of 3/4" squares:
Anyway, as part of the festivities, we gave out ribbons for the quilts. I was in charge of making the ribbons (made from fabric, of course), and I ended up winning two of them.
Long story short, I re-found the quilt, and the ribbons. The quilt is on the bed, and the ribbons have been staring at me from my crafting table. So I decided to make a blue ribbon ATC:
The ATC in close-up:
The blue "ribbon" parts aren't sewn down, so they move a bit. The white center of the ribbon is backed with an extra circle of interfacing. I was too lazy to go find interfacing scraps, so I just cut a circle out from an extra ATC back I had nearby. Which left me with this:
Which is, of course, the start of tomorrow's project...
Sunday, December 4, 2011
ATC Jams
I started a couple of ATC Jams swaps on swap-bot. Jams are sets of three similar ATCs which have been worked on by three people. The first person starts the ATCs by picking out three similar backgrounds. The second person adds something to the ATCs (something similar to each of the three). The third person adds something else and finishes the ATC. Then each person gets to keep one of the three finished ATCs.
I started three Jams swaps. So I needed nine background to start with. Once again, I used the lovely IKEA napkins as a starting point:
I divided them into sets of three and sent them off on their journeys.
The first ATCs I received as part of these swaps were backgrounds started by Dar:
I added some Zentangling to them and sent them off to the third person to finish:
The next set of background I received were these:
My partner in this case didn't understand that all three backgrounds should be similar. We discussed it and she offered to resend, but since I love a challenge, I told her not to bother. So I ended up cutting them up and putting them back together to create these:
Which are some of the weirdest ATCs I've ever made; I consider it a mark of my confidence in partner #3 that I sent these on to her, believing that she'll be able to do something great with them!
And just this Friday I received two sets of ATCs from two different people; both sets are two-thirds finished and just waiting for me to finish them and send them back:
The bottom set was easy to do. I knew that it needed a word, so I pulled out my old dictionary and looked for something related to music. I settled on harmónia, harmonikus, and harmonizál (harmony, harmonious, and harmonize), which in addition to being music-related, also have a nice superficial connection to három (three), the number of people who worked on the project (I know that there's no actual etymological connection, it just sounds nice).
The second set was a bit more difficult. I stared at it for most of the weekend, wondering what to do to finish it, and in the end I settled on the answer that was the first thing that came to mind: Zentangle. Since it was kind of sparkly already, I used my new silver pen on it. The effect is interesting; the tangles are actually rather hard to see until you tilt the ATC and it catches the light in the right way. Unfortunately, it didn't photograph too well:
I can't wait to see how the rest of them all turn out!
Folk Art ATC
I was thrilled to be part of this Folk Art ATC swap. I love the patterns of the typical Hungarian embroidery of the different regions, and I'm always looking for an excuse to use it :) This website has a great collection of patterns. If you scroll to the bottom, all of the links at the end will take you to an image like this one with patterns.
Above, the finished ATC, and below in progress.
Zentangle O, P, and Q
I just got an amazing silver pen, and I've been using it for everything... including the next letters of the Zentangle alphabet series. It's too bad you can't see how sparkly it is:
When I showed the ATCs to Tomi, he complimented them, and also pointed out how neat it was that each of the backs was done differently, so I had to post a picture of them as well:
one sentence journal - November
This is also not an ATC, but pretty neat anyway:
Of course, this was the swap, so every day was something different. Some days I decorated the page entirely, other days I just wrote my one sentence and moved one
The best part, which I'm kicking myself for not taking pictures of, was how I actually bound the book together. Each two or three pages were sewn together in little booklets, and then the booklets were attached to a spine, by wrapping thread around them. Then the spine alone was glued into the cover. Next time I'll take more pictures!
Nyan Cat ATCs
Have I mentioned that I love Nyan Cat? So when this swap came up, I knew I had to join:
These are felt, with an embroidered rainbow and other details. I wanted to make the backs fabric also, but in the end I just glued on paper backs like I've done before.
I only needed one for the swap, so if someone really likes them, I can trade!
These are felt, with an embroidered rainbow and other details. I wanted to make the backs fabric also, but in the end I just glued on paper backs like I've done before.
I only needed one for the swap, so if someone really likes them, I can trade!
Zentangle journal (round 5)
This swap... gah. So, the idea of this swap would be that everyone makes or buys a journal, Zentangles some pages of it, and then passes it on. Well, the first round I participated in was round 4, and my partner never sent to me. She says she's working on it, but... well, we'll see. In the meantime, I found this other journal and started it for round 5 of the swap:
Sorry Ernie is upside-down!
And why one picture is sideways, I don't know...
The intro page is actually my favorite, I think:
Sorry Ernie is upside-down!
And why one picture is sideways, I don't know...
The intro page is actually my favorite, I think:
doodled postcard
Sunday, November 20, 2011
Saturday, November 12, 2011
yet more Zentangles
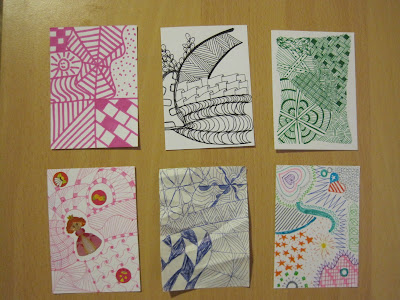
My stash of ready-made ATCs was a bit low, so over the course of several days (and several films), I made these. I've run out of black paper, so I couldn't make a traditional frame for them. So I decided not to make a square frame like I usually o, but something more organic and curvy. I'm not really sure I like the way that idea turned out, but... anyway, here they are :)
Zentnagle L, M, N
Thursday, November 3, 2011
October ATCs
Oops... October sort of slipped by without me posting anything! Well, a quick catch-up of some of the things I made in the last month.
A needle book for a swap:
And a new pencil case for myself:
Yet another panda ATC for a tag:
This ATC for the Zentangled inchies ATC swap. Drawing on top of watercolored paper was a new experience for me, and I liked how the paper interacted with the ink:
And, just yesterday, this ATC for the 100,000! swap. It's... kinda creepy. The eyes were one of the first bits I did, and then they just kept staring at me gleefully... but with a slightly evil glee, you know?
Saturday, October 15, 2011
Zentangle fixer-uppers
Of course, there is no right and wrong way to draw a Zentangle. One of my favorite parts of drawing tangles is how mistakes can be turned into beauty. It's a great metaphor for life, I think: if you know the right techniques, even ugly ink blots can be turned into some nice Bronx Cheer :) So here are some of my favorite techniques for fixing up various Zentangle problems.
I. Lines that meet - take the time to draw slowly, one stroke at a time. You're not in a hurry! If the strokes don't match up anyway, two of my favorite ways to camouflage are using "camo-dots" or by starting with thicker lines:
II. Fully colored spaces - if you like including black space in your tangles, then take the time to color it in fully (honestly, this is my Zentangle pet peeve!). Having a good pen with a lot of ink is important. Usually I outline a space with a normal pen and then color it in with a thicker one:
III. Paper and pen choice - this is as simple as using high- (or, at least, decent-) quality materials, and taking the time to test out pen to paper before you begin drawing your Zentangle. Of course, occasionally a bleedy pen or one that is about to run out of ink is just the one you need for a certain effect!
IV. Scale - related to pen choice is scale. On a large piece, by all means use the thickest Sharpie you can find. But if you're working on a small piece, try a finer pen. I once received a Zentangle ATC similar to the one I've done below. It took me all of 5 minutes to complete, and 3 of those minutes were searching for the pen. In my humble opinion, this is not a quality Zentangle, and I would barely consider it an ATC:
V. Smudges - usually if I smudge or smear a Zentangle, I just set it aside and start a new one. I have an envelope full of scraps that are great for other projects. But sometimes, you can't just start new. For example, I was recently in a round-robin Zentangle project where I started a tangle and sent it on to four other people, who added to it. Somewhere along the line it aquired several big finger-print sized smudges of... wine? coffee? blood? I don't know, and maybe I'd rather not know. Anyway, it ruined a lovely Zentangle and it was very disappointing. So here's a couple of my favorite ways of hiding smudges of any color:
Use some Bronx Cheer or Squidoo:
Using this little guy. I don't know if this an actual Zentangle pattern or something I made up - if it has a real name, please let me know in the comments:
Here's my round-robin Zentangle with one of the smudges:
One idea is to recreate the single piece of tangle within that string that is smudged:
And then glue it on (it's not actually glued in this picture, which is why there is a shadow):
Or, create a more visible patch for the smudge using a different shape or color. In the end, this is what I decided to do about this tangle. Since there are several smudges that need to be covered, I'm going to go them all in blue circles, and it will have a neat bubbly effect:
Monday, October 3, 2011
I, J, K Zentangled letters
Numbers 142, 143, and 144 are the next three letters in the Zentangled alphabet series:
Of course, I stuck to using only patterns starting with that letter - some Inapods and Intersections, my new favorite Japonica and some Jitterz, and Kandysnake and my old nemesis Keeko. Like the others ones, the letters are cut out and the black is the backing.
141 - message ATC
A "message ATC" for the swap with the same name. Another really cool idea for an ATC - take an ATC and attach pages to the back of it to make a little mini notebook.
Zentangle Sampler ATCs
Zentangle Sampler ATCs. This is just a great swap idea and these were a blast to make. I can't wait to see what I get in return!
Numbers 136 to 140 in the count.
Subscribe to:
Posts (Atom)